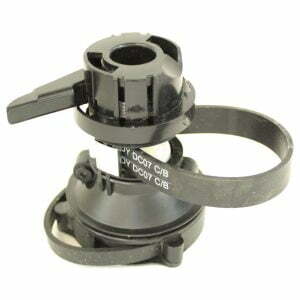
Clutch Replacement On Dyson DC07 And DC14 Vacuum Cleaners

It’s estimated that over 20 million Dyson DC07 and DC14 vacuum cleaners have been sold around the world since their launch in 2001. This makes them some of the most popular models on the market, but it also means that a lot of people are now looking to replace the clutch on these devices. In this article we’ll outline exactly what you need to know about replacing clutches on Dyson DC07 and DC14 vacuum cleaners, including tips for successful installation and repair.
Replacing the clutch is an important part of ensuring your vacuum cleaner runs as effectively as possible, so understanding the process can help keep yours running smoothly for years to come. The good news is that with patience and a few tools, anyone should be able to replace their own clutch without having to call out a professional.
Whether you’re new to repairing vacuums or simply want a refresher course on how best to tackle this task, our guide will provide all the information you need – from things like identifying when your device needs its clutch changed, through to detailed instructions for completing the job yourself at home. So let’s get started!
Diagnosing Clutch Malfunction On Dyson DC07 And DC14
Diagnosing clutch malfunctions on Dyson DC07 and DC14 vacuum cleaners can be a tricky task. Fortunately, there are several tips to help identify the problem so that you can take the appropriate steps for repairing it. First, check whether the brushroll is spinning correctly; if not, this may indicate an issue with the belt or clutch itself. Additionally, inspect any loose components within the vacuum’s housing; these could be signs of wear and tear in the clutch assembly. Finally, listen closely while running your machine: If you hear grinding noises coming from inside, then this could suggest a breakdown in the clutch mechanism. While you’re working on your machine, you should probably check your pre-motor filter and HEPA filter to make sure they are new and fresh.
Now that we have identified possible issues with your Dyson vacuum cleaner’s clutch malfunctioning, let’s move onto understanding how to replace it. Before attempting any repairs, always ensure you have unplugged the device from its power source and taken proper safety precautions when dealing with small parts. Once ready to begin work on replacing the faulty component, carefully remove all screws and clips which hold together different elements of the appliance such as filters and covers. Then proceed by disconnecting all wires connected to both ends of the defective part before removing it completely from its place – making sure to keep track of where each wire was originally attached!
Step-By-Step Guide To Replacing The Clutch
Replacing the clutch on a Dyson DC07 or DC14 vacuum cleaner can seem like a daunting task. But, with the right tools and guidance, you’ll be back cleaning in no time! Here’s how to get started:
First, it is important to gather all necessary materials before beginning the process. You will need a Philips screwdriver, several replacement parts (clutch assembly, drive belt), and an adjustable wrench. Another key factor for success is taking your time – don’t rush this job if you want to avoid costly mistakes down the road.
The next step is actually replacing the clutch mechanism itself. This requires removing multiple screws from around the base of the unit that secure both components together. After carefully loosening each one, use your wrench to unscrew them completely and remove them from their slots. Once complete, disconnect any wiring connected to the old motor and replace it with the new part according to manufacturer instructions. Finally, reassemble everything as it was originally installed and give yourself a pat on the back – you have successfully replaced your Dysons’ clutch!
These steps are just a starting point when it comes to repairing these popular vacuums; now let’s look at troubleshooting some common issues that come up after installation is complete…
Troubleshooting Common Issues With A Replaced Clutch
It is often assumed that a replaced clutch on Dyson DC07 and DC14 vacuum cleaners should be easy to install, with no potential for issues. But is this the truth? Let’s investigate. Replacing the clutch can indeed be relatively straightforward if all of the necessary steps are followed carefully. However, there may still be common problems that arise after it has been installed – such as difficulty in getting suction or the machine not running properly.
So what do you do if you experience these issues? Firstly, check whether any parts have become loose during installation; even something small like an O-ring can cause big problems down the line! Secondly, make sure that your replacement part is compatible with your model of vacuum cleaner; using a non-compatible part could easily lead to difficulties with operation. Finally, take note of any error messages displayed on the control panel, as they will provide useful clues regarding why your machine isn’t functioning correctly.
In other words, while replacing a clutch on Dyson DC07 and DC14 vacuum cleaners doesn’t need to be overly complex, being aware of some potential pitfalls could save time and effort further down the line. As such, it pays to stay vigilant when making repairs so you don’t end up having to fix them again!
Conclusion
In conclusion, replacing the clutch on Dyson DC07 and DC14 vacuum cleaners can be a daunting task for those who are unfamiliar with such repairs. However, by following our step-by-step guide and troubleshooting common issues that could arise, you should be able to complete this repair successfully. Replacing the clutch is symbolic of revitalizing something: it’s like taking an old machine and giving it new life! You’ll also have a sense of accomplishment knowing you were able to diagnose and fix the issue yourself. With patience and focus, I’m sure you can make your Dyson DC07 or 14 work almost as good as new again.


